DIY Thanksgiving Dinner Place Cards

In this tutorial, we make Thanksgiving dinner place cards using our Acrylic Tube Paint Set. This premium quality paint set comes with 12 brilliant and intermixable colors, perfect for anyone wanting to take up painting.
Turkey Inspiration:
Get to know that American icon sitting on your Thanksgiving table by sharing these fun facts to get your dinnertime conversation going:
–Despite their awkward and off kilter appearance, wild turkeys are much more agile than they appear, running up to speeds of 25 miles per hour and flying as fast as 55 miles per hour.
–A turkey’s gender can be determined by its droppings- males produce spiral shaped poop, and females’ poop is shaped like the letter J.
–Despite their heft (up to 25lbs) and reputation for being ground dwellers, wild turkeys often roost overnight in trees to avoid predators.
–Male turkeys are called “gobblers,” after the “gobble” call they make to announce themselves to females (which are called “hens”) to compete with other males. Other turkey sounds include “purrs,” “yelps” and "keekees.”
The painting style for this here flock of quirky gobblers and hens is inspired by a folk artist by the name of John “Cornbread” Anderson, otherwise known as just “Cornbread.“ Gobble him! I mean, Google him!
Recommended Art Materials:
#8 flat brush, #1 pointed round brush
scissors, Exacto knife, ruler, glue
Stiff white paper or watercolor paper
colored card stock
palette or small dish for paint mixing
water for rinsing brushes
paper towel

Sketch and Paint:
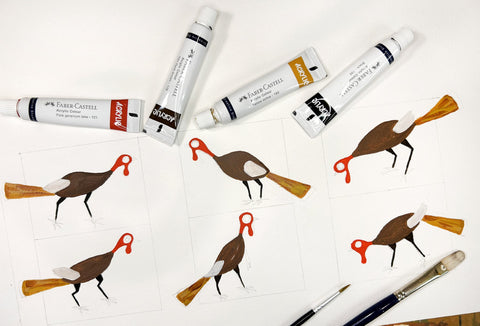
These little turkey place cards are as simple and fun to make as they look! I begin by sketching them onto a 3 x 4 format on stiff watercolor paper. Each turkey is a little different, but they don’t have to be.I also extend the turkey’s tail beyond the the border so that the turkey body can be larger on the card– its a nice design detail. Don’t forget to leave space for your guest’s name.
Then I paint them all at once, using each color- the red head, the brown body, the yellow ochre tail, the white wing. Finally I add the black spot detail on the wing with the edge of my #8 flat brush. I paint their eye, then the long thin black legs and feet with a nicely pointed #1 round brush.
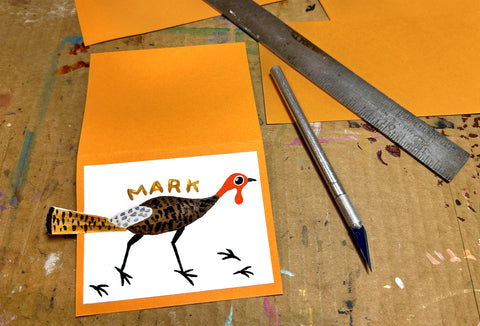
Adding the human names to the turkeys makes the whole idea very fun!

Cut Out and Glue:
The final step is to cut out the designs with a straight edge and Exacto knife (don’t forget to cut around the tails) and position and glue them onto pieces of 4 1/2 x 7 colored card stock. I chose a color that ties in with my table, and matches the dinner napkin for each place setting (although of course, that is not necessary.)

Fold and voila!
I guarantee that your dinner guests will enjoy their personalized little gobbler card just as much as you enjoyed making them!
Happy Thanksgiving, and as always, have fun making art!


